Wednesday, December 27, 2006

Beware, mouse can bite


Now, the promised yarn about the guitar I couldn’t give away. This comes with a warning to use your mouse in the correct manner with the wrist elevated and not pivoting on the desktop. Before you read this you may like to see two background posts (No1, No2).

MOUSEBITE gave me hell in the mid-90s. The newspaper group where I worked as an editor and page designer had updated its computers.
We had moved to big Macs for the layout. After working mainly on mouse-less publishing systems for decades I was now clicking intensively.
The habit of resting the heel of my right hand on the desk and pivoting while using the mouse created a little callus.
After a year or so, the impact point had a slight redness and gave an occasional painful twinge.
I would joke about the little "mousebite" but about six months later the inflammation suddenly spread into the wrist and the twinges became bursts of head-splitting pain.
The doctor advised me to wear a wrist brace, which limited my guitar playing and slowed me down a lot at work.
THINGS were pretty bleak as I struggled through each day at work, with every slight wrist movement causing intense pain.
After about three months, I feared the injury would ‘take me out’ from my career in journalism and I could hardly play guitar at all.
We moved into a new house that needed some cleaning up around the yard but the mousebite now stopped any sudden or loadbearing movements.
Painkillers helped me get through work but I couldn’t play the guitar.
DEPRESSION was the likely cause of a lapse of judgment with my old Eko guitar.
A workmate in his early twenties asked me if I could recommend a guitar brand. He wanted to learn to play.
I said I had a great guitar that he could have. "Just help me move a few logs around my new property, maybe two hours work, and the guitar is yours," I said.
A few days later I asked if he would take up the offer.
"I have to be honest with you, John," he said. "I asked the bloke in the guitar shop about Eko guitars.
"He said they made terrible guitars and not to touch one with a barge pole. I bought a new guitar from him for $500."
Talk about gullible! I offer this 20-something groover a vintage guitar with solid top for virtually nothing and he believes a salesman who tells him not to touch it with a barge pole.
The Eko acoustics do have a special sound, probably because of the thick two-pack finish. The sound is thinner than one would expect from a solid-top guitar but certainly is characteristic of the Eko.
THE wrist pain eventually retreated, and I could play again. Almost a decade later, my old Eko serves me nicely.
A recent innovation was to sand the gloss from the soundboard finish and remove the big plastic scratchplate. This made the tone more even across the range.
Next time the strings are off, I may strip the soundboard back to the timber and just seal it with beeswax.
Such a procedure had a remarkable effect on a similar 1960s high-gloss guitar I had once. That was a Bolero – which a modern guitarshop hero probably would not touch with a barge pole.
The Bolero, with ply soundboard, was marvellous after a stripping and tinkering. Watch out, Eko!

Saturday, December 09, 2006

More about home-made clamping systems

Repair of the old Eko acoustic takes a step …

A LITTLE palette-knife with long handle gets the glue in the right spot, using just a few drops of wood glue at a time so it doesn’t run everywhere. If the chocks are glued to the guitar, they could be in there until it receives the next big hit on a solid object.
The bottle set-ups (described in the last post) are placed out of the range of the area to be glued.
You must unscrew the bottle lid and judge the correct pressure/height by "feel" with your hand through the soundhole, if possible.
The Eko has a big soundhole and the split strut is within the vision, making the repair a little easier than it may have been if the damage was deeper in the guitar.
More luck: The back of the guitar is still fixed firmly to the sides, so the strut and the ding appear to be the only damage.

WHILE on back damage: Another clamping system I devised works well on reattaching a guitar back that has split off from the sides.
Take two flexible timber slats each about 1.3-1.5m long. The treated pine that is used on lattice is ideal because it is springy.
Put Slat 1 on the work area (floor or bench) and place the guitar body on it, taking care to position the body where it will need the pressure.
Now, lay the Slat 2 over the guitar back directly above the bottom slat. At this stage you should be able to pull together the ends of Slats 1 and 2 to judge the degree of pressure on the guitar back.
If it is difficult to pull together the slat ends, you may need longer slats.
Simply wrap wire around the slat ends to complete this custom-made guitar body clamp. The bends in Slats 1 and 2 should create arches over the body front and back and put pressure at the guitar sides.
To increase or decrease pressure, simply tighten or loosen the wire at the ends, or use G-clamps to pull the slats closer together.
Once you have it working, take it off, apply glue to the split and you are in business.

WITH the Eko, I use the lattice-slat technique in conjunction with the vitamin bottles to get the right mix of interior and exterior pressure and fix the strut and the ding.
The guitar then hangs around for another 10 years or so before I get around to replacing the missing nut and string it up for the first time.
It plays well but the thick resin finish appears to hold in a lot of the resonance. Nevertheless, the old Eko, bought for $2, is working again and I am happy.

Next: My failed attempt to give the guitar to a workmate.

Friday, December 08, 2006

Lifecycle of a 1960s Eko jumbo acoustic guitar


The guitar that I couldn’t give away is taking up some of my time nowadays. It’s a 60s jumbo acoustic Eko. Here’s the story:

A GARAGE sale crowd shuffles through a house in the Sydney inner western suburb of Petersham on a rainy Saturday morning in the late 1980s.
The vendor seems to be selling up and moving out in a hurry. A stocky man with long curly hair and maybe in his 30s, he is pacing around the house and attending to the swarm of buyers.
The terrace-style house is on the edge of the Italian precinct of Leichhardt and the Portuguese belt of Petersham and he speaks with an accent that suggests mediterranean heritage.
Racial origins are important to this story because it is about an Italian-made guitar that is the subject of one of the shortest conversations that day.
I ask, "How much?" He replies, "Two dollars." I hurriedly sift through coins in my left palm, drop the $2 into his hand, say "thank you" and leave as quickly as I can, trying not to seem too keen in case he reconsiders and wants the guitar back or more money.

THE guitar has a severe ding in the back and rattles, the sort of injury that suggests a swing when held by the neck and the impact of the body on a solid object.
Such a wound is a fairly common symptom of relationship tensions. It always makes one wonder whether the solid object was a head.
However, any head in the way of this guitar would be unlikely to think clearly again.
The 1960s Eko is one of the heavyduty items in the guitar army’s strike force. You could rewrite the "built like a tank" cliché and substitute "Eko".
Angled struts criss-cross under the solid timber soundboard. The whole guitar is coated with an incredibly thick epoxy type finish. It is heavy.

THE term "Italianate", sometimes with a connotation of extreme attention to detail, serves the Eko well.
The thickness of the finish can be seen in the chips from the edges. The final clear coat is about 1mm thick.
Behind the 50mm ding in this one, a split strut hangs loosely. The nut is missing.
Several weeks after the acquisition I repair the damage by using clamping systems that I have devised over the years.
The interior damage calls for the vitamin-bottle system. This involves using the screw top lids to exert pressure between the front and the back.
The threaded lids, in conjunction with a chock or two, top or bottom, allow a precise height adjustment. Sometimes a chock must be put on the bottom with double-sided tape to allow the device to be placed accurately in awkward positions, maybe deep inside the guitar. Other times, the chock may be taped to the guitar instead.

WORKING in such confines is difficult. You need a pen or small torch and a small mirror (a dental mirror is ideal) to inspect the interior. Barbecue tongs can help in the inspection and subsequent manoeuvring. Consider all sorts of small grabbing and holding mechanism – crocodile clips, clothing pegs, long-nosed pliers, kitchen utensils … mix and match and commandeer anything you can think of to suit the individual problem.
A hard hit has detached the Eko’s centre strut on one side but the other side has held tightly. Part of the strut has split away totally. It’s all fixable.

Story to be continued. Watch this site for more on the $2 guitar that in years to come I couldn’t give away. And that was just my good luck.

Monday, December 04, 2006

Dirty picture with knot in G-string


EVERYTHING has to be "sustainable" nowadays. Energy, industry, environment and guitar strings.
Now, guitarists around the world can join the throng, thanks to the dayinthelifeofaguitar string conservation and recycling plan.
This would save heaps of Red House (sorry, greenhouse) gases, if pluckers and strummers everywhere adopted the policy, Never Throw Out An Old String.
This writer has followed this policy for decades. See the picture showing simple string recycling techniques.
Some will smile, others laugh and others show their fangs in disgust.
But whatever emotions the shocking vision invokes, let one thing be clear.
The guitar plays well. Kept clean and free of ingrained grime and corrosion, old strings can keep serving long after they end their first term.
The Policy dates from the 1980s when I had a bit of a guitar collection. Updating the strings on one guitar is fair enough but try paying out for a dozen sets and tying up hundreds of dollars on instruments that are played only occasionally.
When I bought a secondhand guitar that missed a string or five, I simply reached for the String Recycle Box.
This allowed me to fully string up the guitar and test it for faults, action and intonation before starting any repairs and adjustments, and without risking good strings on the temporary task.
An essential part of the policy is, Never Cut A String End For Aesthetic Purpose, because you never know when you may need the practicality of those few spare centimetres.
The best way to join strings is to connect the anchor, as supplied by the manufacturer, on String 1 with the free end of String 2, which is passed through the hole on the anchor and twisted back around itself until it has no chance of slipping free.
In the mid-80s, my mate, Pat Hussey, a professional muso and a string fanatic, gave me a box of a few dozen of his old sets.
The "throwaways" that Pat replaced after a gig or two lasted me two decades.
I have only just started buying new strings. Over the years, many of my jamming mates have rolled around in hysteria after noticing the conglomeration of twisted wire on my headstocks.
But the saving gives the last laugh.
If you are addicted to the sound of new strings, you would not adopt my methods in a million strums, unless you were geographically disadvantaged or fiscally challenged.
However, if you use your strings for more than a few outings, you won’t notice any difference. Most of the jammers who at first collapse in mirth later say my guitars sound sweet, despite any string joins.
Even I take off a string when the winding breaks down.
When I bought new strings recently after so long out of the market, I had to admit they sounded good but a serial string recycler is unlikely to repent.

Sunday, November 26, 2006

Vintage electric guitar is big-headed instrument


THE dayinthelifeofaguitarfiddlingwithacoltoneproject is ticking away nicely. Now strung with a new set of Dean Markley F150 gauge, and with the neck reshaped down from lump of wood to a player friendly profile, the old 1960s cheapie ColTone shows a stunning quality.
Some of its resonance and clarity may stem from the elevation of the bridge, as outlined in the earlier posts, but the headstock is likely to have a bit to do with it.
The headstock measures 26.5cm from the nut to the tip. This compares with 19cm on my tele copy.
The position of the machine heads fans the string anchoring widely over the headstock, perhaps contributing more resonance.
The ColTone headstock was, in fact, an item of amusement for the only other ColTone owner I have been able to find.
We wrote to each other a few times several years ago, after I found a reference to his ColTone in his band profile, which has since disappeared from the internet.
Again, I promise to comb my pile of back-up discs at some stage to recycle a bit more info from him on this rare guitar brand.
Please, ColTone owners and anyone who knows anything about the brand, contact me so I can record it on this site.
We don’t want the ColTone to remain in obscurity when we have an opportunity to write some history.
My success so far in bringing my old maroon ColTone, with accordian-style pick-up switches, up to a high standard of playability through a few adjustments has encouraged me to keep up the amateur luthier approach here.

NEXT post, I’ll have a touch of humour on another subject. Pat Hussey, now of Nelson, South Australia, should get a grin out of this. My first jamming mate and I were at opposite ends of the scale. He was and most likely still is an obsessive string changer, feeling to heart the loss of brilliance after even a few hours playing. I have always defended using strings right through until they expire, avoiding the nuisance of bedding in new sets and preferring the security and predictability that other players may describe as dullness (to me it is ‘mellowness’). Of course, it is important to keep old strings clean. The amount of grime that becomes embedded in the wound strings and builds up under the plain types would shock a plumber. Anyway, more on this in a few days.

Saturday, November 18, 2006

Don't fret, fix it


My Guitar Survival Guide, officially announced in the pending stock exchange prospectus as adayinthelifeofaguitaronthecheapmaintence, just to get the investors in, will feature from time to time, unveiling tips to make the most of your guitar when you just cannot race down to the music store, for instance, to buy a set of strings or replace broken hardware.
The tips will suit those who live in the country, others short of cash and another group, just plain mean. The writer may fit all three categories.
As this idea progresses, we could set up a forum. But today, here’s a useful way to improve the playability of a guitar that has been caressed so vigorously that its damaged frets affect the fingering of the notes. Before trying anything I write you should seek a second opinion, preferably from a trained luthier. For at least some isolated guitarists, that may mean talking to your horse or dog. Watch out, they may have suffered your constant attacks on their peace and quiet for so long that they bark or snort twice for "yes" just to shut you down with a useless instrument. They're like that.

THE love that the guitar engenders to so many players of all levels shows on the secondhand market. Many players often have a limited style and push the strings down so hard that deep grooves wear into the frets on their chord patterns.
My old ColTone twin-pickup solid, now under a renovation program (see earlier posts), had severe wear on the treble side of the first and second frets.
The former owner must have been a typical open-chord player … maybe F, G, A, C, D, E and a few minors and sevenths.
The wear over about 40 years caused the strings to rattle on the higher frets. The fret wire is extremely narrow and I wondered if I could match it easily with a new product, even if I could make the trip.
In any case, I live on an island without easy access to a repair shop or agent.


THIS time to get the guitar back into action quickly I have removed the two worst worn frets, the 1st and 2nd, along with the 21st and 22nd, the highest on the fretboard and, out of the ex-owner’s playing zone, in pristine condition.
It has been simple to cut the good frets to the right width with a high-speed hand tool and file off the edges, then use them in the first and second slots.
The damaged frets, when transferred to the high positions (see picture), still allow the playing of the guitar’s highest treble notes because the strings pass beside the problematic grooves.
These repositioned frets are too short to cover the 5th and 6th strings, but that’s not much of a worry for anyone but an extremely good player who routinely goes to the limits.
It certainly does not interfere with any of the songs in my repertoire, even though I occasionally venture into the high zones while playing my arrangements of jazz standards, mainly from the golden age from Jolson to bop.

TECHNICAL NOTES
1. Fret removal.
This can be done best with the guitar on a benchtop and secured in a vice (as discussed) in No 2.
Be careful not to damage the fretboard. I used a chisel that was slightly blunted and, bracing the neck with one hand carefully slid the chisel between the ridge on the top of the wire and the fretboard.
Applying slight horizontal pressure to the butted union of wire and wood, I also gently twisted the chisel handle to give just a hint of an uplift. I repeated the manoeuvre on the other side of the fret and slowly worked along the full length to prize the fret out.
Excessive force risks splitting off pieces of fretboard because the wire has little groves at the bottom to help it anchor into the wood. Even the gentlest pressure may cause tiny splinters from the slot.
I have found it best not to touch these small splinters because the new fret should push them securely back into their "home".
It seems that in most cases a sharp blow along the empty slot is enough to ensure it is clear of any debris that could upset the seating for the new fret. Any awkward splinters that resist the savage breath will yield to brain surgery with a razor-like edge.
2. Fret installation. A "workmate"-style vice/benchtop with timber plates in the jaws provided the mounting for may latest operation.
Small pieces of foam dishcloth formed padding against the vice jaws for further protection of the neck
I had earlier dismembered the old ColTone so I only needed to secure the neck. Support for the body should be considered when trying this with any guitar with non-removable neck.
Here’s the detail: Place the fretwire into position on the slot. Tap it gently on one side with a small hammer but don’t hammer it any more than it starts to grab. This will only be a millimetre or so.
The aim then is to even up the progress across the full length of the fret. Use a small straight edge, as in a wooden chock, tool handle or whatever to keep pressure on the seated part, while working across the fret. If it is too awkward to hold down the straight edge manually, consider some sort of ancillary bracing, or clamping.
Work from side to side, hammering the fret in only about 1mm at a time, until it is fully seated and visually matches the height of the others. Any sharp edges on the fret may need a quick file. Otherwise, you can move on to the test phase.

IT may pay to use old strings to test the on-the-cheap fret replacement. Adustments may still be necessary so the last thing anyone wants is to risk damage to new strings by continued tightening and loosening, or taking them off a few times.
I test the frets with just the 1st and 6th strings, adjusting the bridge height and harmonics, if possible, and playing every note. In many cases they can be slackened off and pushed aside to allow attention to problem points.
Then, they are quickly recommissioned to test subsequent adjustments.
To start the testing, slowly bring the bridge height to the preferred "action". If all notes are clear, you are back in business.
If there is string rattle, track down the offending frets. Sometimes you can see that the fret in front of a rattle is not seated right down. You have two options.
Return the neck and fretboard to the vice mount to try hammering the fret down into position:
Before you try this, ensure there is no build-up of grime that will stop the fret going down. Clean away all grime with a semi-stiff brush, about hard-toothbrush grade, and a little all-purpose household cleaning agent such as window cleaner. A scalpel point will scratch off stubborn grime, which can set like resin but eventually softens if you are patient. Sorry, this cleaning should have been done earlier, but now you know, at least.
Before you start hammering, place the chock over the part of the fret that is seated properly and keep on the pressure while you hit the "bump". This is to stop the good side rising and creating a new problem, as can happen if the wire is bent.
If the fret bump is in any way intransigent, go for option 2, which is:
File the bump down to match the profile of its neighbours. Use a fine flat file (mine is about 5mm wide), and take just a little at a time, tightening up the string regularly to see where the buzz cuts out. Stop filing as soon as you get a clear note. You can polish the fret(s) with super-fine emery paper but be mindful that you may not want even this gentle cutting against the grain of the fretboard.

WELL, I guess that’s it for now. I’ll be back with more tips for guitarists in the bush. For the time being, don’t take care, Take Five, which I just tried on the ColTone. She wasn’t made for cool jazz but she’s getting there. Maybe, instead of quoting Dave Brubeck I should have used a BB King analogy and reported, "The Buzz is Gone."

Monday, October 30, 2006

Guitar 'smash' goes online

WORD is spreading through the internet: "Visit www.adayinthelifeofaguitar.blogspot.com – there’s an idiot breaking up a rare guitar."
About all I can say is, Hendrix, Townshend and a few other have been the smashers, the guitar attracts lots of bashers and all I am trying to do is make an old Japanese cheapie play a little better.
The renovation of the ColTone two-pick-up solid, however, was destined to run the opposite to smoothly.
The last post told how three of the four screws holding the neck broke, and created a flow-on effect of problems.
Since then, the head flipped off one of the six adjustment screws on the neck pickup as soon as a screwdriver went in the slot to remove them before a cleanup of almost half a century of grime.
Oh well, it will still work. I’m not touching another thing there; traces of grime can stay in the nooks and crannies.
There are plenty of other pressure points, anyway.
The frets have also given me lots of angst, with deep grooves in the first ssecond and to a lesser extent the third.
The last owner must have been big on open chords and long fingernails. The fretboard also has deep furrows.
The emergency solution for a country dweller without ability to run down to a local music shop to get some fret wire was simple: Remove the last two from the fretboard to replace the first two, which now go to the treble side at No 21 and 22, pending a proper replacement in future.
This allows me to have a chance at the guitar’s highest notes, if I ever need to get up there.


THE ColTone is now back together, with the previously listed adjustments but I must get a set of strings before I can finish the setup.
The nut puts the strings too close to the fretboard, so that will require attention.
Please, if anyone knows about ColTone guitars, please write to me and I'll post the details.


SOON, I’ll move on to writing some original observations about guitars generally, my love of the instrument and other players.
I also have a guitar stories floating around in the archives of my editorial column, Classie Corner (
www.classiecorner.blogspot.com), so they’ll be in the mix here in the days, weeks, months and years to come.

Friday, October 27, 2006

Wrestling with a guitar neck


ANGRY curses echoed around my home workshop when the neck of a rare guitar refused to part with the body.
The wrestling match began after my commitment to make minor improvements to a rare and "trashy" 1960s solid body guitar.
You are reading history here because documentation of the ColTone brand is rare, even on the huge network of the internet (see last post).
The neck was so thick, with a sharp angular profile instead of comfortably rounded, that it was too awkward and left-hand challenging to ever give me any joy.
The options were to keep it as a display piece and leave it silent, or to ‘have a go’ at making it play better.
This meant the resolve to reshape the neck and tilt it back slightly to give better clearance of the pickups.


UNUSUAL aspects of the ColTone include the pickups floating on rubber bases that slot into the rebates on the body.
A lack of up-and-down adjustment meant the pickup at the neck was too close to the strings to allow right-hand freedom.
When amateur luthier finally confronted intransigent neck the bout went like this:
Three of the four screws passing through the backplate and holding the neck broke virtually on the first hint of torque. The steel must have been good, back in the 60s, don’t you reckon?
Then, I tried to drill out the screws that still held the neck to the body and had some success, judging by the steel shavings, but each time the bit slipped and stared chewing out the wood.
Still, the neck would not budge, so I helped it with a chisel between the neck and body.
Three hits with the mallet showed the reason for stubbornness. When the neck came away, part of it split off and stayed behind on the body.

YOU guessed right. The makers had applied a fair dollop of glue. I now had another problem and tried to remove the shards to glue them back on place.
More hassles: they would not come off cleanly and most were useless.
The picture shows the back of the neck after stage-one of the remedial action to square it up and fill the screw holes.
The back of the neck, meanwhile, is feeling the cutting edge of a coarse sandpaper and I bring it back to a comfortable profile.
I could keep writing about this for quite a while but have come to the limit today.

AS the blog continues I will have stories not just about the rarer brands but about the big names like Gibson, Fender, Maton etc.
Thanks for joining me. I hope to be on this blog for quite a while. A Day in the Life of a Guitar is here to stay.

Wednesday, October 25, 2006

Wanted: Info on ColTone guitars


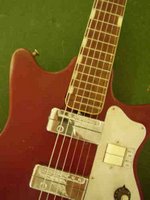
THE picture shows what may be one of the world’s rarest guitar brands. A Google search today for the name, "ColTone", returned only one guitar reference. It was for "original 60s ColTone bass guitar" at $59.
The item has since been removed from ebay, so a research stream ran dry.
My ColTone two-pickup solid came from a garage sale just a few years ago.
The vendor, who looked to be in his 50s, said he had owned it since he was a kid.
The guitar has similarities to my first electric, an Ibanez two-pickup solid, which I bought through classified advertising in the Launceston Examiner, also in the 1960s.
At the time, the brand, Ibanez, was hardly known. The vendor gave it a French flourish, pronouncing it as "eye-bun-ay", which I blindly followed for a fair while.
The Japanese manufacturer slowly made inroads into the world market and I had to give in eventually and admit "I wuz rong".
A bloke called John Andrews bought my Ibanez in the early 70s and I went on to love a dreadnought acoustic of another rare brand, Bolero. More about that in future posts.


THE ColTone, like my early Ibanez, has a painted maroon body and a thick neck, the timber in which could be the same.
Both guitars seem to say "early Japanese", with about the same sophistication as the "ay" word.
A Google search just after the $20 ColTone acquisition gave another "one reference" result.
A guitarist blogging about his garage band said he loved his "trashy old ColTone".
Unfortunately, our correspondence is somewhere in a heap of back-up discs with vague labels. It may turn up at a later date.
However, he said I was the only other ColTone owner he knew of, after he bought his secondhand in recent years.
He had been unable to get any firm info about them, but someone had suggested "ColTone" had been a rebadging of a Japanese guitar, whose brand I forget. The name started with "T".
A reference to the huge headstock caused a grin through cyberspace, with my correspondent expressing a little amusement. The head, which looks as big as that of a double bass, is quite comical.

THE picture shows another tailpiece I fitted to replace a tin-can tremolo setup that had broken. I have strung it with a mismatched collection, just as the first test, and indications are that it tunes up okay.
No matter how rare this guitar is, I intend to reshape the neck so I can at least have a chance to enjoy playing it.
Any information about ColTone guitars would be welcome.

THAT'S about it for the second of many posts on this site. Thanks for joining me. Readers are welcome to visit my other blog, www.classiecorner.blogspot.com, which focuses on the marvellous world of classified advertising.

New instrument sounds first notes


GUITARS have come a long way since the 1960s and my first unbranded six-string acoustic with a neck like a hunk of ‘four by two’ timber.
But one thing remains the same through time: The guitar’s ability to take over lives and settle in for long-term tenancy in Cardio Street.
The slightly clumsy piece of joinery that first stole my heart found me through a classified advertisement in my local paper. No, it wasn’t in the personal column.
Imperfect as it was, the basic six-string steel started a passion for collecting guitars and many have passed through my hands on their way to a groping elsewhere.
The list includes not only the common top-line brands, such as Maton, Gibson and Fender, but also lots of other well known names (Ibanez, Washburn, DiGiorgio, Guyatone).
Some brands , such as ColTone, Horola and Bolero, are so obscure that references are hard or impossible to find.
All the guitars have been special to me. I miss some and regret ever letting them out of my control.
After flirting with so many cuties over the years I now have a longterm relationship with something a little meaner, a Telecaster copy.
The Hurricane by Morris stayed in its case under my bed for more than a decade during an emphasis on acoustic.
However, the black tele began to love me after a fair bit of fiddling to get the action and the neck angle just right.
A shim was needed to tilt the neck back slightly because the action was so close to the pickups and scratch plate that it upset the righthand movements.
This change simply meant a bit more height at the bridge.
I now cannot bear to think that the Hurricane and I ever will part company.
It is as good to play as any of the big name guitars I have caressed but, as one would expect, the pick-ups are not as good.
The sound tends to muddy at the higher levels but I have found that just a touch of reverb on the amp helps to sharpen it, without introducing more treble.
As a classic tele copy, it naturally has treble capacity galore but I have it set for a nice warm jazzy sound.

THANKS for joining me on this blog where I will soon get off my own (guitar) case and on to others, such as the bloke who has had a Fender Jazzmaster since its release in, I think, 1958, and another whose one-owner early 60s Telecaster came unscathed through a car accident that left him in a coma for months. Remarkably, the tele owner still plays professionally. As things progress, with permission of the players, I will introduce them to visitors to this site.

THE name for this blog, adayinthelifeofaguitar, honours the great Brazilian guitarist Luiz Bonfa. His great melody, Carnival (subtitled Manha de Carnaval or Morning of the Carnival), inspired a change of lyrics to suit the non-guitar-addicted community. The orginal says, "I'll sing as I play my guitar ..." The rewrite: "A day in the life of a fool ..." It makes one wonder why they bothered.